Lab 2 - Installing Perses from source code
Lab Goal
To install using the source code, test the project, build the project, configure examples, and run the Perses dashboard project on your local machine.
Source - Locally installing Perses
Installing on your local machine can be done in just a few steps with our
Perses Easy Install project.
This contains the source code from a released version of Perses, see
readme for the exact version, and uses a simple automated installation script.
This automated installation project is used to install both Perses (which by itself has no examples set up) and to pre-populate the instance with a project, dashboard, and datasources.
On the next slide you will download and install Perses using the Perses Easy Install project.
This automated installation project is used to install both Perses (which by itself has no examples set up) and to pre-populate the instance with a project, dashboard, and datasources.
On the next slide you will download and install Perses using the Perses Easy Install project.
Source - Using the easy install project
The Perses Easy Install project takes just 3 steps to a running server:
Let's walk through these steps one by one in the next slides...
- Download and unzip project.
- Run the
init.shfile in a console. - Connect in a browser window.
Let's walk through these steps one by one in the next slides...
Source - Downloading and unzip project
The first step is to
download the project.
Unzipping (use your file manager or console) should look something like this:
							$ unzip perses-install-demo-v1.6.zip

Archive:  perses-install-demo-v1.6.zip
creating: perses-install-demo-v1.6/
extracting: perses-install-demo-v1.6/.gitignore
inflating: perses-install-demo-v1.6/README.md
creating: perses-install-demo-v1.6/docs/
creating: perses-install-demo-v1.6/docs/demo-images/
inflating: perses-install-demo-v1.6/init.bat
inflating: perses-install-demo-v1.6/init.sh
creating: perses-install-demo-v1.6/installs/
inflating: perses-install-demo-v1.6/installs/README
inflating: perses-install-demo-v1.6/installs/perses-[VERSION].zip
creating: perses-install-demo-v1.6/support/
extracting: perses-install-demo-v1.6/support/README
creating: perses-install-demo-v1.6/support/bin/
inflating: perses-install-demo-v1.6/support/bin/percli-darwin-amd64.zip
...
Source - Getting started with install script
In our example here we will run the console-based installation script (note the VERSION text
below is to be replaced with the version of the project you have downloaded):
							$ cd perses-install-demo-{VERSION}

$ ./init.sh
Source - Enjoy the welcome ascii art!
First, you are presented with welcome art and details about this project:
								#############################################################
##                                                         ##
##  Setting up the Perses Easy Install demo                ##
##                                                         ##
##           ####  ##### ####   #### #####  ####           ##
##           #   # #     #   # #     #     #               ##
##           ####  ###   ####   ###  ###    ###            ##
##           #     #     #  #      # #         #           ##
##           #     ##### #   # ####  ##### ####            ##
##                                                         ##
##                #####  ###   #### #   #                  ##
##                #     #   # #      # #                   ##
##                ###   #####  ###    #                    ##
##                #     #   #     #   #                    ##
##                ##### #   # ####    #                    ##
##                                                         ##
##        ##### #   #  #### #####  ###  #     #            ##
##          #   ##  # #       #   #   # #     #            ##
##          #   # # #  ###    #   ##### #     #            ##
##          #   #  ##     #   #   #   # #     #            ##
##        ##### #   # ####    #   #   # ##### #####        ##
##                                                         ##
##  brought to you by Eric D. Schabell                     ##
##                                                         ##
##  git@gitlab.com:o11y-workshops/perses-install-demo.git  ##
##                                                         ##
#############################################################
Intermezzo - Whoops... that's not right?
Note that there are many fail-safe checks in this script, and you found the first one! Read the
help messages in the console output and fix it by running it with the right argument:
							...
Checking the build mode arguments...

To use this installation script you have to provide one argument
indicating how you want to install the Perses server. You have the
option to install a container image or build it from source:

	$ ./init.sh {podman|source}

Both methods are validated by the install scripts.

$ ./init.sh source
Source - Checking build dependencies
This time, as you scroll down the output, you'll see validation for dependencies needed to
build the Perses project. Should any fail, you will be pointed to installation help. Here all
checks are passing (noting your versions reported might be different, as long as they pass):
							Checking the build mode arguments...

Installing from source...

Installing Perses from the source project...

Checking for Go version needed to use Perses:
Go major version is good...
Go minor version is good...
Your Go version 1.21 accepted!

Checking for Node version needed to use Perses:
Node major version is good...
Your Node version 20 accepted!

Checking for NPM version needed to use Perses:
NPM version: 10
NPM major version is good...
Your NPM version 10 accepted!
Source - Unpacking and building project
As you scroll further down the output, you see the Perses project is installed into the
target directory. We then run the tests and start building the project:
							Unpacking Perses project into target directory:
Perses project unpacked successfully into target directory!

Let's move to the Perses project home directory...

Building the Perses server (this takes a bit, so wait for
it to complete):

cd ./ui && npm install && npm run build
...
Source - Building Perses completes
Eventually (cut out of the log here due to length of the build), the build should complete and
the Perses server is ready to use. Here you see the console output showing a successful
build (scroll to see code):
							@perses-dev/app:build:
@perses-dev/app:build: webpack 5.93.0 compiled with 2 warnings in 9445 ms

 Tasks:    18 successful, 18 total
Cached:    0 cached, 18 total
  Time:    35.589s

>> compressing assets
scripts/compress_assets.sh
GOARCH=arm64 GOOS=darwin go generate ./internal/api
>> build the perses api
CGO_ENABLED=0 GOARCH=arm64 GOOS=darwin go build -ldflags "-s -w -X github.com/prometheus/common/version.Version=0.50.0 -X github.com/prometheus/common/version.Revision=260e073d77ae11db8d77abcb83a0bf15767f40ce -X github.com/prometheus/common/version.BuildDate=2025-01-03 -X github.com/prometheus/common/version.Branch=main" -o ./bin/perses ./cmd/perses
>> build the perses cli
CGO_ENABLED=0 GOARCH=arm64 GOOS=darwin go build -ldflags "-s -w -X github.com/prometheus/common/version.Version=0.50.0 -X github.com/prometheus/common/version.Revision=260e073d77ae11db8d77abcb83a0bf15767f40ce -X github.com/prometheus/common/version.BuildDate=2025-01-03 -X github.com/prometheus/common/version.Branch=main" -o ./bin/percli ./cmd/percli
Perses server built successfully!
Source - Adding Perses configuration
Now you'll see a set-up message working to pre-configure our Perses instance with some workshop
configurations:
							Setup workshop configuration...

workshop
workshop/data
workshop/local_db
../../support/data/dashboard.json -> workshop/data/dashboard.json
../../support/data/globaldatasource.json -> workshop/data/globaldatasource.json
../../support/data/globalrole.json -> workshop/data/globalrole.json
../../support/data/globalrolebinding.json -> workshop/data/globalrolebinding.json
../../support/data/globalsecret.json -> workshop/data/globalsecret.json
../../support/data/project.json -> workshop/data/project.json
../../support/data/projectdatasource.json -> workshop/data/projectdatasource.json
../../support/data/secret.json -> workshop/data/secret.json
../../support/data/user.json -> workshop/data/user.json
Source - Starting server and log in
After a successful build, you see the server is started:
							Starting the perses server...

Waiting for server to start...

Setting up example workshop project...

Logging in to Perses instance...
Source - Loading example workshop project
The next steps are loading in our
WorkShopProject which contains an example
dashboard and data sources that we will use to query when building our first dashboard later in
this workshop:
							Applying the demo projects setup...

object "Project" "workshopproject" has been applied

Applying the dashboard setup...

object "Dashboard" "MyFirstDashboard" has been applied in the project "workshopproject"

Applying the demo datasources...

object "Datasource" "PrometheusDemo" has been applied in the project "workshopproject"
object "Datasource" "PrometheusBrowser" has been applied in the project "workshopproject"
object "Datasource" "PrometheusDemoLocal" has been applied in the project "workshopproject"
Source - Sharing the end report
After a successful build, the end report is presented with the final instructions on how to
open the Perses dashboard and how to stop the server when done with this workshop:
								======================================================
=                                                    =
=  Install complete, get ready to rock Perses!       =
=                                                    =
=  The Perses dashboard can be opened at:            =
=                                                    =
=           http://localhost:8080                    =
=                                                    =
=  Getting started workshop available online:        =
=                                                    =
=  https://o11y-workshops.gitlab.io/workshop-perses  =
=                                                    =
=  Note: When finished using the Perses server you   =
=  can kill it from the command line with the        =
=  following cmd to locate the process id (PID):     =
=                                                    =
=      $ ps aux | grep perses                        =
=                                                    =
=      $ kill [PID]                                  =
=                                                    =
======================================================
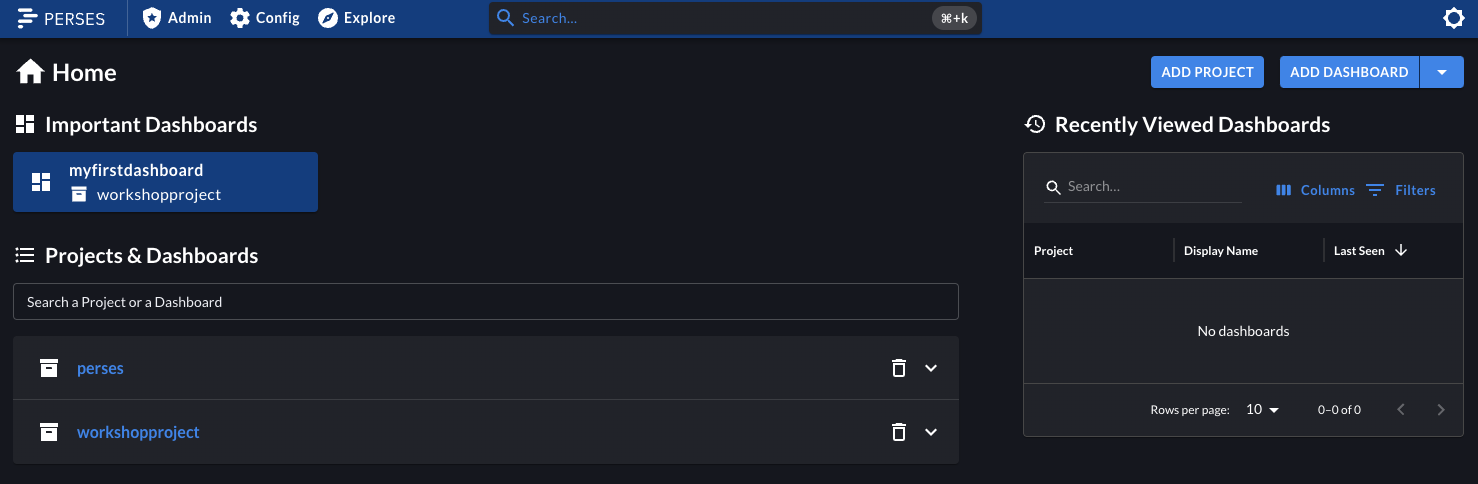
Source - Connecting in a browser

Source - Connecting in a browser (dark mode)
Click on the icon in the top right corner for dark mode:
Lab completed - Results
Next up, exploring dashboard tooling...

Contact - are there any questions?
Eric D. Schabell
Director Evangelism
Contact: @ericschabell {@fosstodon.org) or https://www.schabell.org
Director Evangelism
Contact: @ericschabell {@fosstodon.org) or https://www.schabell.org
Up next in workshop...
Lab 2 - Installing Perses from source code